SPI flash support in embedded Linux box
by Wenwei Weng
Serial Peripheral Interface (SPI) flash memory is often used in an embedded Linux box to hold bootloader. During very initial board bringup, SPI flash memory needs to be programmed properly using device like Dediprog, otherwise the box won’t boot. After the box is up running linux, often there is need to access SPI flash, e.g. upgrade new version of bootloader from linux. I will share what needs to be done for that.
SPI Flash: hardware overview
There are many flash memory devices in the market, often people see USB flash memory, SD card. Those flash memory are parallel flash, eithe NOR or NAND flash. With parell access, the throughput is a lot higher. SPI flash is accessed in a serial way, so it is much slower.
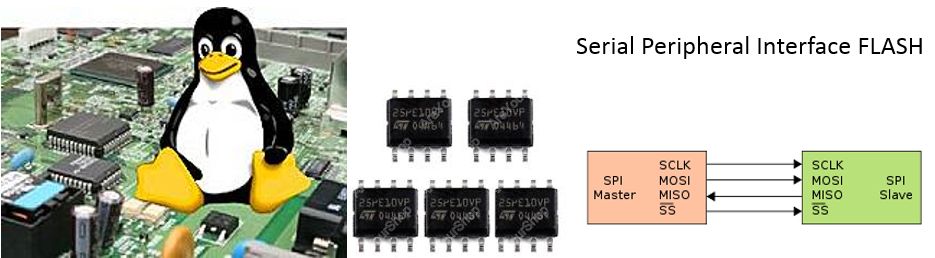
SPI devices communicate in full duplex mode using a master-slave architecture with a single master. The master device originates the frame for reading and writing. Multiple slave devices are supported through selection with individual slave select (SS) lines.
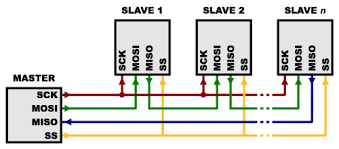
SCK: Serial Clock MOSI: Master Output Slave Input MISO: Master Input Slave Output SS: Slave Select
SPI Master often is provided by SoC, SPI flash device serves as SPI slave.
What are needed to enable SPI flash access from Linux ?
There are three areas to do in order to enable SPI flash access from Linux user space.
Enable SPI controller in device tree.
In my case, Marvell ARMADA 7040 SoC has SPI controller provided, I need do the following:
bash-4.3# cat armada-7040-db.dts
...
                        spi@700680 {
                                compatible = "marvell,armada-380-spi";
                                reg = <0x700680 0x50>;
                                #address-cells = <0x1>;
                                #size-cells = <0x0>;
                                cell-index = <0x2>;
                                clocks = <0x26 0x1 0x15>;
                                status = “okay";

                                spi-flash@0 {
                                        #address-cells = <0x1>;
                                        #size-cells = <0x1>;
                                        compatible = "jedec,spi-nor";
                                        reg = <0x0>;
                                        spi-max-frequency = <0x1312d00>;

                                        partition@0 {
                                                label = "boot";
                                                reg = <0x0 0x200000>;
                                        };

                                        partition@200000 {
                                                label = "Filesystem";
                                                reg = <0x200000 0xd00000>;
                                        };

                                        partition@d00000 {
                                                label = "boot_2nd";
                                                reg = <0xf00000 0x100000>;
                                        };
                                };
                        };
...
From the above, DTS defined the SPI flash to have three partitions: “boot”, “Filesystem” and “boot_2nd”. We will see how this definition is manifested in linux system.
Integrate the dtb file into linux boot in a proper way depending your situation.
Enable proper kernel drivers for SPI
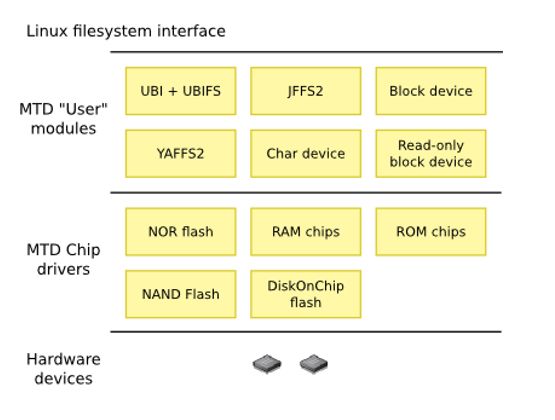
Linux kernel has done a lot work to support SPI flash so that user space can access SPI flash easily. It has following architecture:
To enable SPI access, the following kernel configurations are required:
bash-4.3# cat .config
...
CONFIG_MTD=y
CONFIG_MTD_BLKDEVS=y
CONFIG_MTD_BLOCK=y
CONFIG_MTD_M25P80=y
CONFIG_MTD_SPI_NOR=y
CONFIG_MTD_SPI_NOR_USE_4K_SECTORS=y
...
CONFIG_SPI=y
CONFIG_SPI_MASTER=y
CONFIG_SPI_ARMADA_3700=y
...
Access from user space
With the changes in DTS and kernel, after linux boots, the below will be observed in kernel space:
bash# dmesg
.......
[    4.110288] m25p80 spi2.0: n25q128a13 (16384 Kbytes)
[    4.115301] 3 ofpart partitions found on MTD device spi2.0
[    4.120815] Creating 3 MTD partitions on "spi2.0":
[    4.125632] 0x000000000000-0x000000200000 : "boot"
[    4.130895] 0x000000200000-0x000000f00000 : "Filesystem"
[    4.136619] 0x000000f00000-0x000001000000 : "boot_2nd"
.......
From the user space, the first thing can be seen is the mtd device files:
bash#  ls -l /dev/mtd*
crw------- 1 root root 90, 0 Feb  6 08:14 /dev/mtd0
crw------- 1 root root 90, 1 Feb  6 08:14 /dev/mtd0ro
crw------- 1 root root 90, 2 Feb  6 08:14 /dev/mtd1
crw------- 1 root root 90, 3 Feb  6 08:14 /dev/mtd1ro
crw------- 1 root root 90, 4 Feb  6 08:14 /dev/mtd2
crw------- 1 root root 90, 5 Feb  6 08:14 /dev/mtd2ro
brw------- 1 root disk 31, 0 Feb  6 08:14 /dev/mtdblock0
brw------- 1 root disk 31, 1 Feb  6 08:14 /dev/mtdblock1
brw------- 1 root disk 31, 2 Feb  6 08:14 /dev/mtdblock2
/dev/mtdblock0 is for “boot” (first bootloader) partition; /dev/mtdblock1 is for “FileSystem” partition; /dev/mtdblock2 is for “boot_2nd” partition.
what can we do now? Life is easy with all these infrastructure in place.
- To program a new version bootloader, simply: dd if=new-bootloader.bin of=/dev/mtdblock0
- If we want to use partition as file system, simply:
- mkdir /mnt/spi
- mkfs.jffs2 /dev/mtdblock1
- mount -t jfss2 /dev/mtdblock1 /mnt/spi
Life is good!
References:
- http://free-electrons.com/blog/managing-flash-storage-with-linux/
- http://slideplayer.com/slide/10452504/
Subscribe via RSS